Dify 创建 Flux AI 免费绘图应用

本文介绍了如何利用 Dify 创建 Flux AI 免费绘图应用。只需要在 Dify 中输入提示词和图片分辨率,Dify 会直接返回图片。文中还介绍了如何获取硅基流动的免费 API,以及如何自定义 Dify 的绘图插件。
一、Flux AI 简介
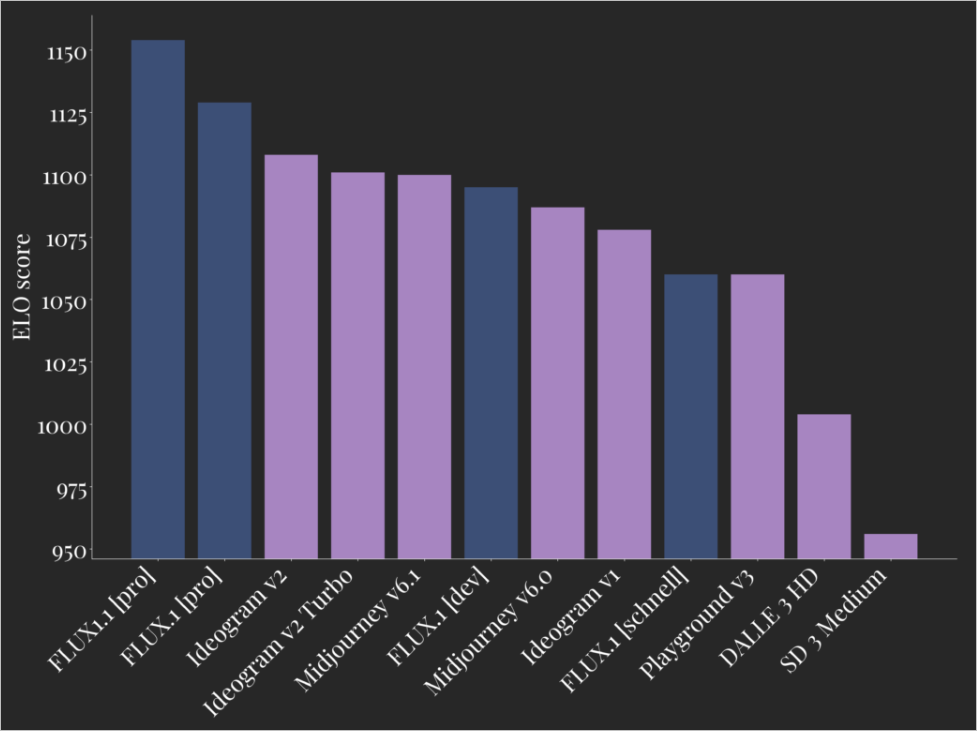
AI 绘画,开源中知名度最高的肯定是 Stable Diffusion。在 2024年8月1日,来自 Stable Diffusion 团队的成员成立了黑森林实验室公司(Black Forest Labs),致力于开发最先进的开源生成模型,用于图像和视频。目前公司有 4 款 AI 绘图模型:[1]
- FLUX1.1 [pro] :2024年10月1日发布的最先进且高效的版本,代号“蓝莓”,是目前市面最强的 AI 画图模型(是的,强于Midjourney)。比FLUX.1 [pro]快六倍,同时提升图像质量、提示遵循能力和多样性。
- FLUX.1 [pro] :顶级性能图像生成模型,闭源模型,具有最先进的提示遵循能力、视觉质量、细节表现和输出多样性。适用于商业和企业级应用。
- FLUX.1 [dev] :是 FLUX.1 [pro] 的蒸馏版本,开源但不可商用,适合非商业应用,至少需要24G显存运行。
- FLUX.1 [schnell] :最快速的本地开发和个人使用模型,有120亿参数,完全开源(Apache2.0许可)。和FLUX.1 [dev]一样,权重可在 Hugging Face上获取,并支持 ComfyUI 的集成。
二、获取 Flux 免费 API
目前市面上有很多厂商都提供 Flux 的 API 接口,针对 FLUX.1 [schnell] 模型,因为模型小,有一些厂商提供了免费的 API 额度。下面两个厂商都只需要简单注册即可使用,不需要绑定任何信用卡信息,所以作为推荐。
-
硅基流动提供了每分钟调用 2 次,每天 400 次的免费额度(IPM=2 IPD=400)。[2]
-
Together.ai 提供了每分钟调用 10 次的免费额度(10 img/min)。[3]
后面我会利用硅基流动进行演示,其他厂商的对接步骤大同小异。
Siliconflow
硅基流动(Siliconflow)是一家北京公司,SiliconCloud 平台提供模型云服务。平台上提供了多种开源大语言模型和图像生成模型,包括 Qwen2.5、DeepSeek-V2.5、Llama-3.1等。用户可以免费使用部分参数较小的模型,例如 Qwen2.5(7B)、Llama3.1(8B)、FLUX.1-schnell 等多个模型的 API 可以免费使用(有限速)。
这里不演示账号注册过程,注册之后,可以通过官网提供的界面直接体验各个模型。例如,下面使用 FLUX.1 [schnell] 模型进行绘图。[4]
模型 FLUX.1 [schnell] ,提示词“Kung Fu Panda holds a "Dify with Flux" banner, Pixar style.”,图片比例16:9。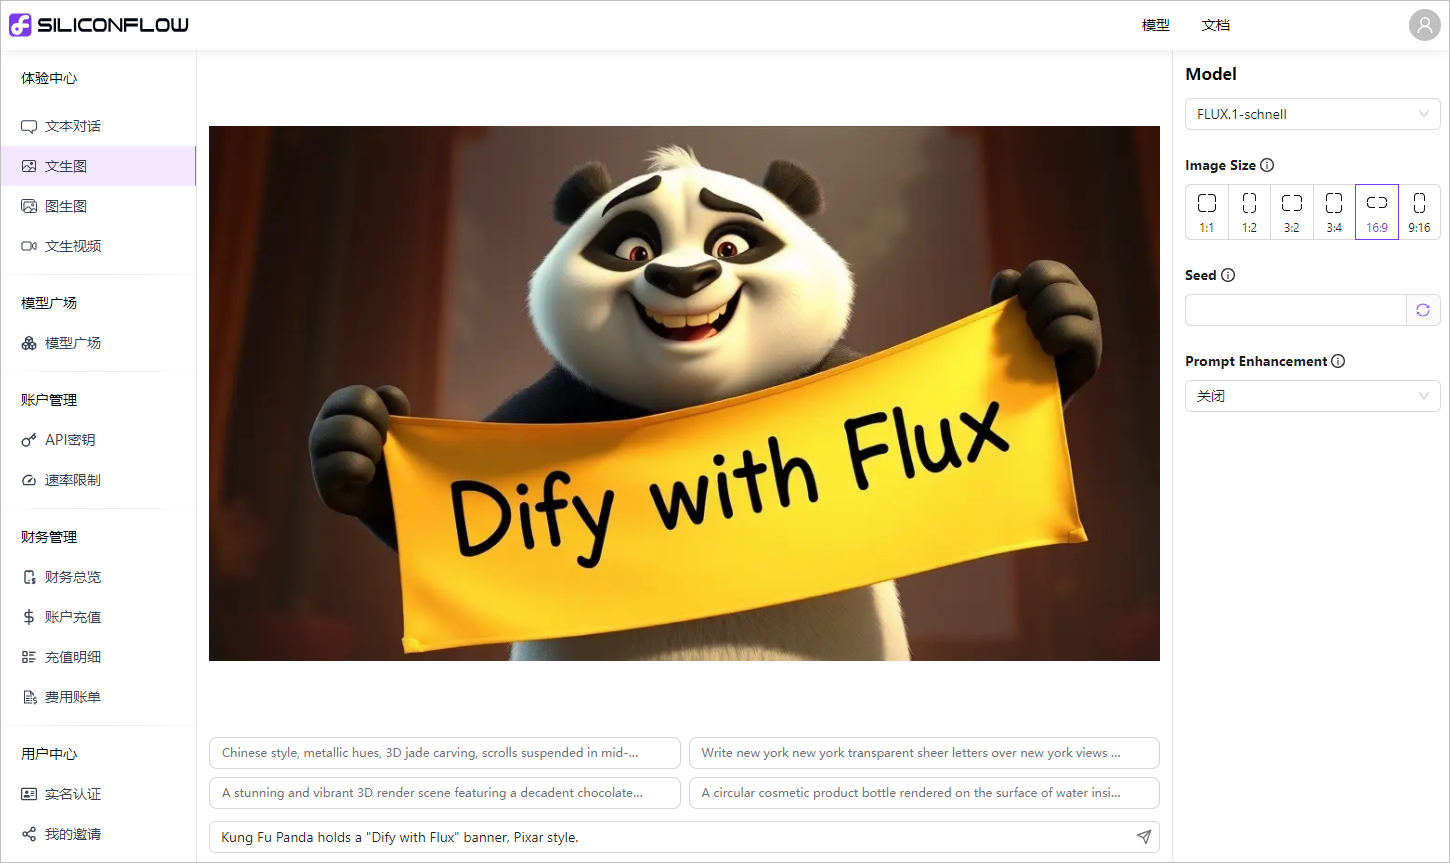
点击页面左侧“API秘钥”,创建一个秘钥,后续 Dify 自定义工具需要调用这个秘钥信息。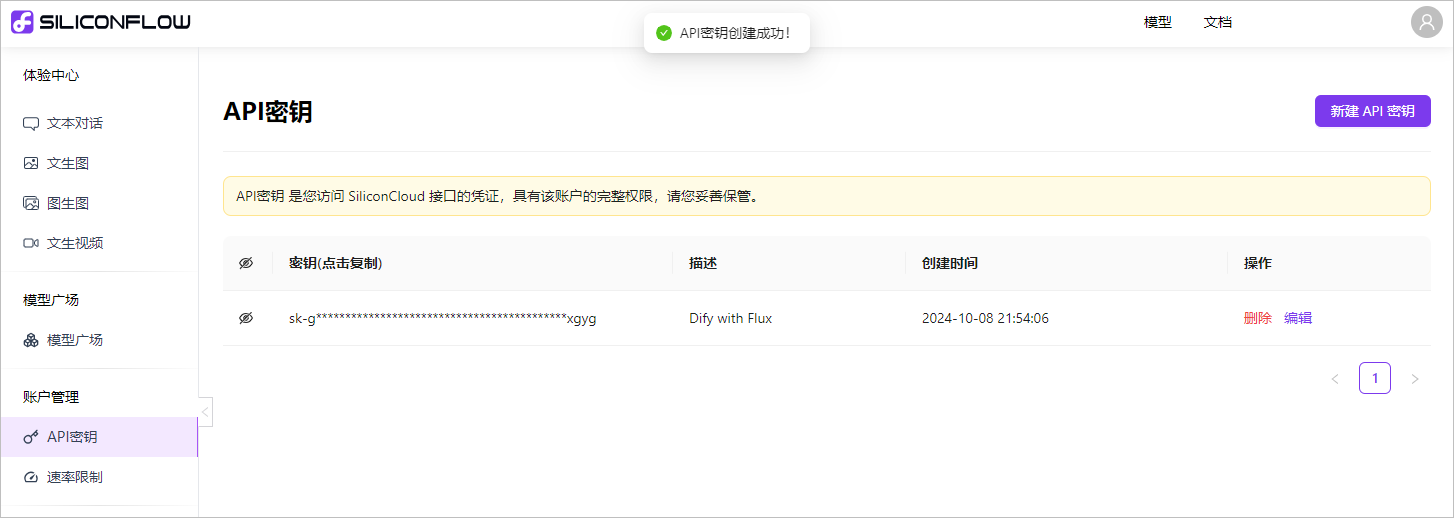
Together.ai
Together.ai 是一家成立于2022年6月,总部位于美国硅谷的开源生成式人工智能平台。目前的内容主要是开发去中心化的AI技术,提供开源的AI模型。为各种大模型提供了统一的API接入,包括文本生成和代码生成模型。其中FLUX.1 [schnell] 模型可以免费使用。
这里不演示账号的注册过程,注册之后,厂商会赠送5美元的额度,可以体验一些付费模型,例如这里使用FLUX.1.1 [pro]模型绘图测试,这个模型的价格是每张图 0.04 美元。[5]
模型 FLUX.1.1 [pro] ,提示词“Kung Fu Panda holds a "Dify with Flux" banner, Pixar style.”,像素“1024x576”。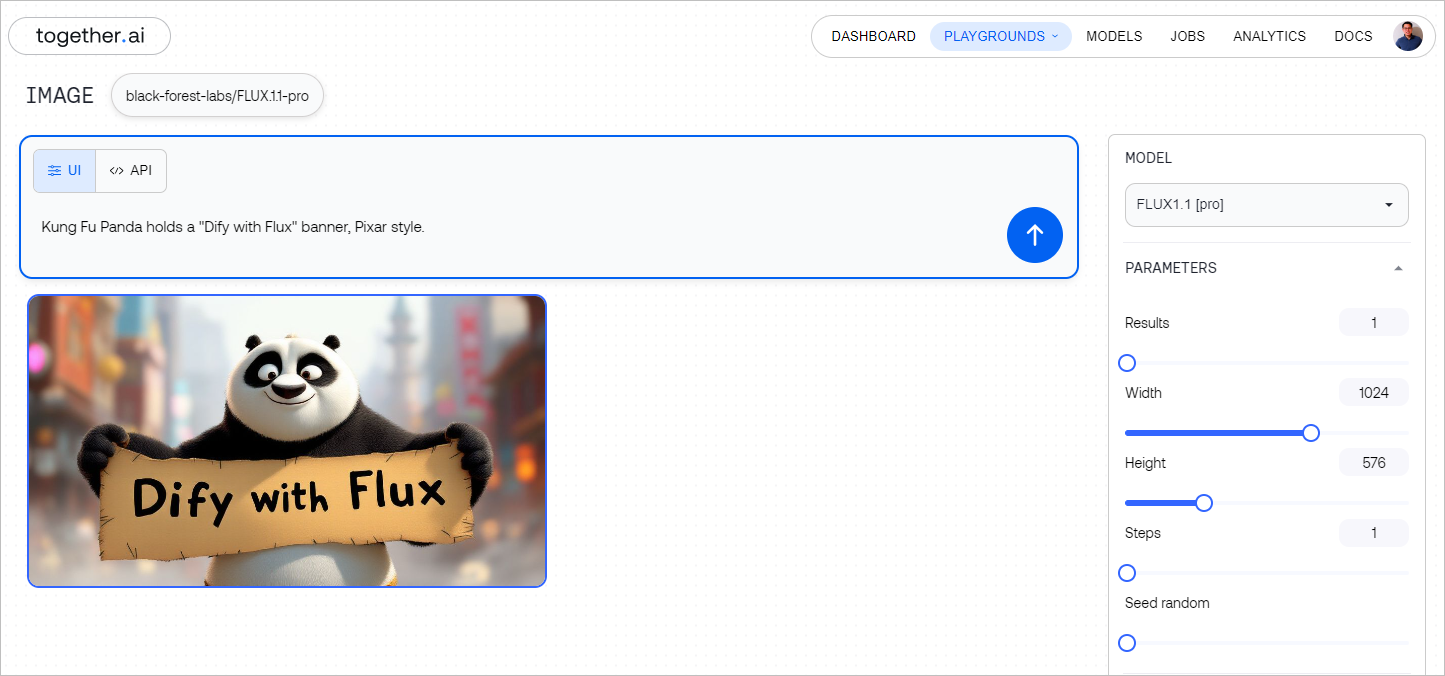
三、Dify 自定义工具
Dify 没有 FLUX 绘图的插件,这里演示一下如何自定义 FLUX 的绘图插件。
查看模型 FLUX.1 [schnell]的API文档,拷贝这个请求格式,复制给ChatGPT,让写一个对应的 OpenAPI Schema。[6]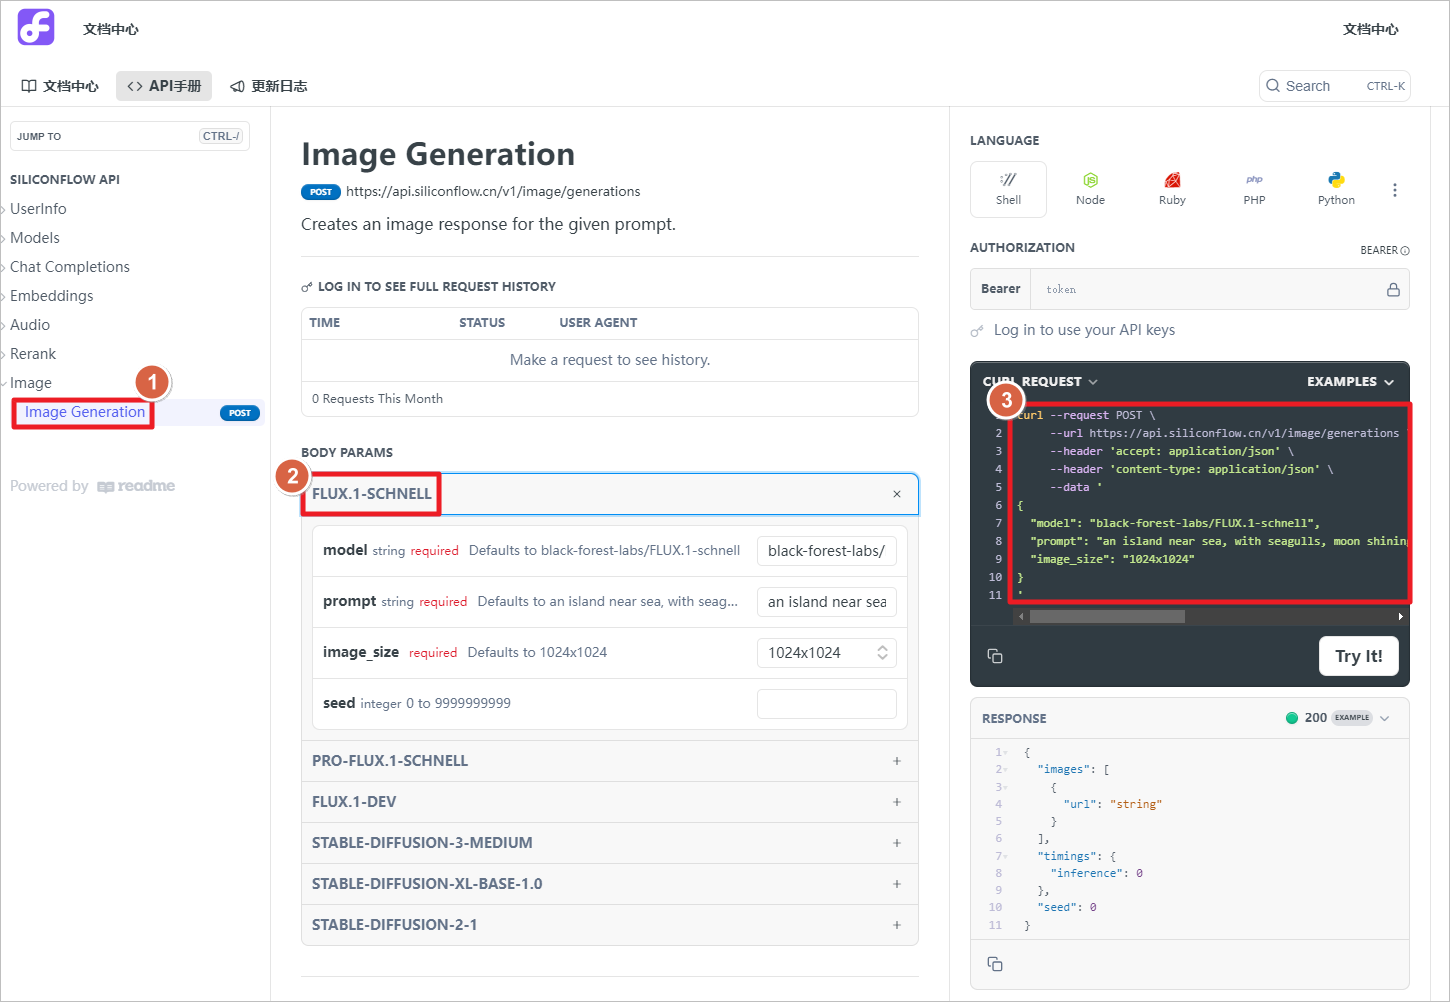
写给 ChatGPT 的 Prompt。
curl --request POST \
     --url https://api.siliconflow.cn/v1/black-forest-labs/FLUX.1-schnell/text-to-image \
     --header 'accept: application/json' \
     --header 'content-type: application/json' \
     --data '
{
  "prompt": "an island near sea, with seagulls, moon shining over the sea, light house, boats int he background, fish flying over the sea",
  "image_size": "768x1024",
  "num_inference_steps": 20
}

基于上面的内容,写一个OpenAPI Schema
ChatGPT 的回复,后续复制到 Dify 的自定义工具中去。
openapi: 3.0.3
info:
  title: FLUX.1 Schnell Text-to-Image API
  description: This API generates images based on a text prompt.
  version: 1.0.0
servers:
  - url: https://api.siliconflow.cn/v1/black-forest-labs
    description: Production Server
paths:
  /FLUX.1-schnell/text-to-image:
    post:
      summary: Generate an image from a text prompt
      operationId: generateImage
      requestBody:
        required: true
        content:
          application/json:
            schema:
              type: object
              properties:
                prompt:
                  type: string
                  description: The text prompt to generate the image.
                  example: an island near sea, with seagulls, moon shining over the sea, light house, boats in the background, fish flying over the sea
                image_size:
                  type: string
                  description: The desired size of the generated image.
                  example: 768x1024
                num_inference_steps:
                  type: integer
                  description: The number of inference steps for generating the image.
                  example: 20
      responses:
        '200':
          description: Image generated successfully
          content:
            application/json:
              schema:
                type: object
                properties:
                  image_url:
                    type: string
                    description: URL of the generated image
                    example: https://api.siliconflow.cn/v1/black-forest-labs/images/generated-image-12345.png
        '400':
          description: Bad request
          content:
            application/json:
              schema:
                type: object
                properties:
                  error:
                    type: string
                    description: Error message
                    example: Invalid prompt or parameters
      headers:
        accept:
          description: Accepted response format
          required: true
          schema:
            type: string
            example: application/json
        content-type:
          description: Content type of the request
          required: true
          schema:
            type: string
            example: application/json
在 Dify 平台上,点击“创建自定义工具”,设置工具的名称,复制 ChatGPT 回复的 OpenAPI Schema,点击“测试”。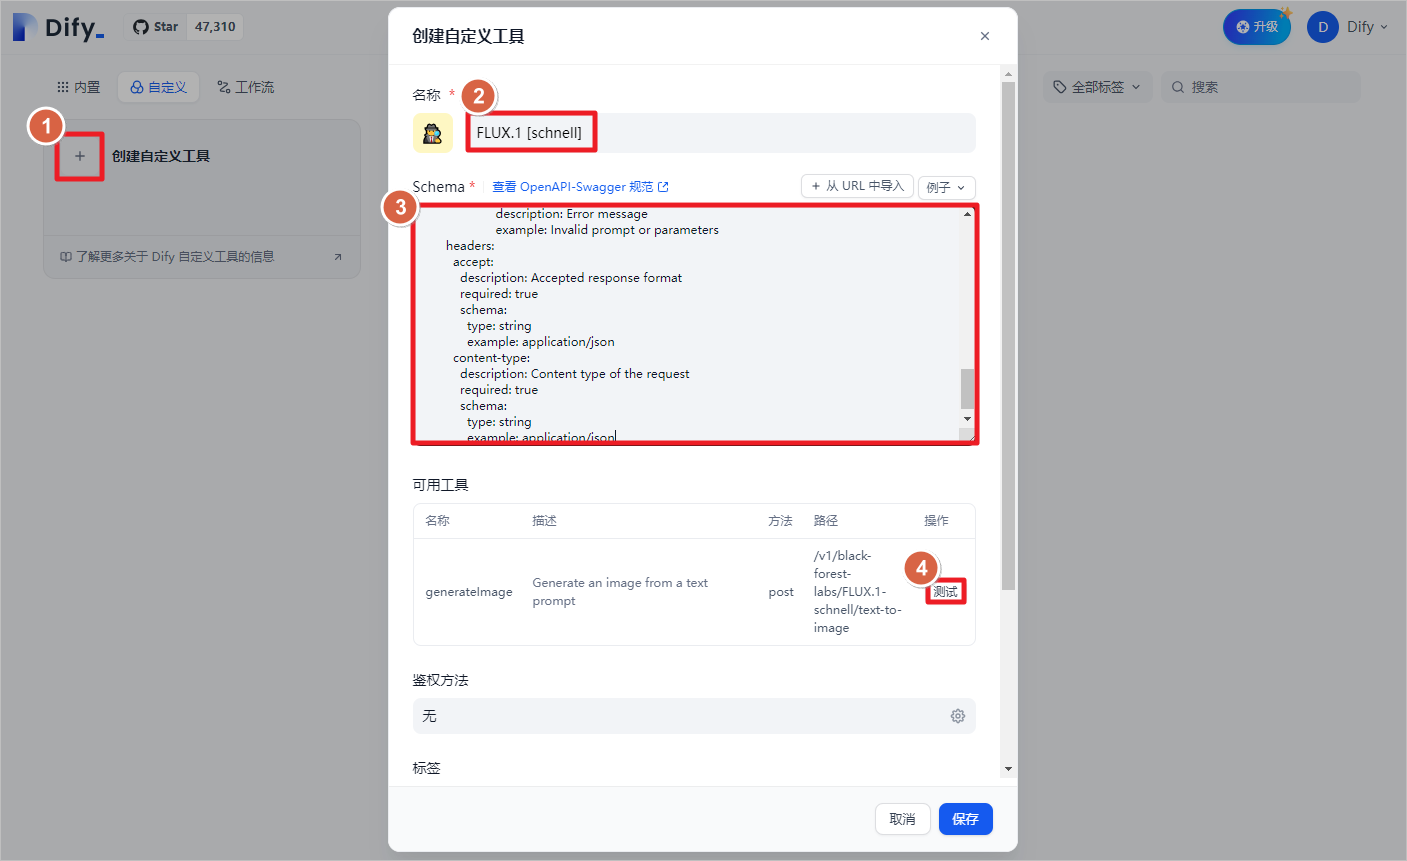
设置API Key方式授权,前缀设置为Bearer,输入硅基流动创建的API Key值,点击“保存”(此 API 我已经删除)。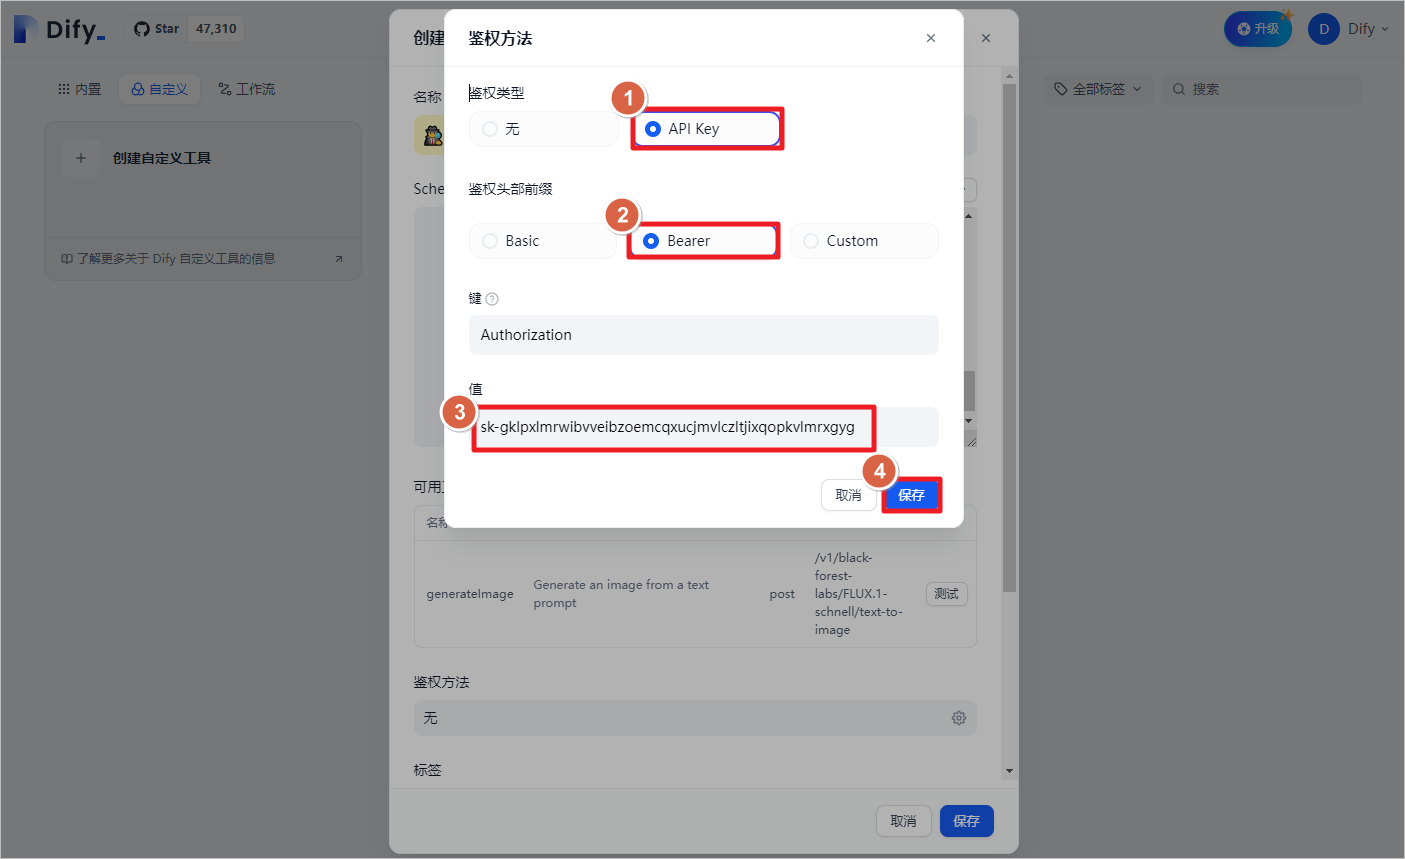
输入提示词,分辨率和推理步数进行测试,查看返回的测试结果。测试成功,返回了图片的URL。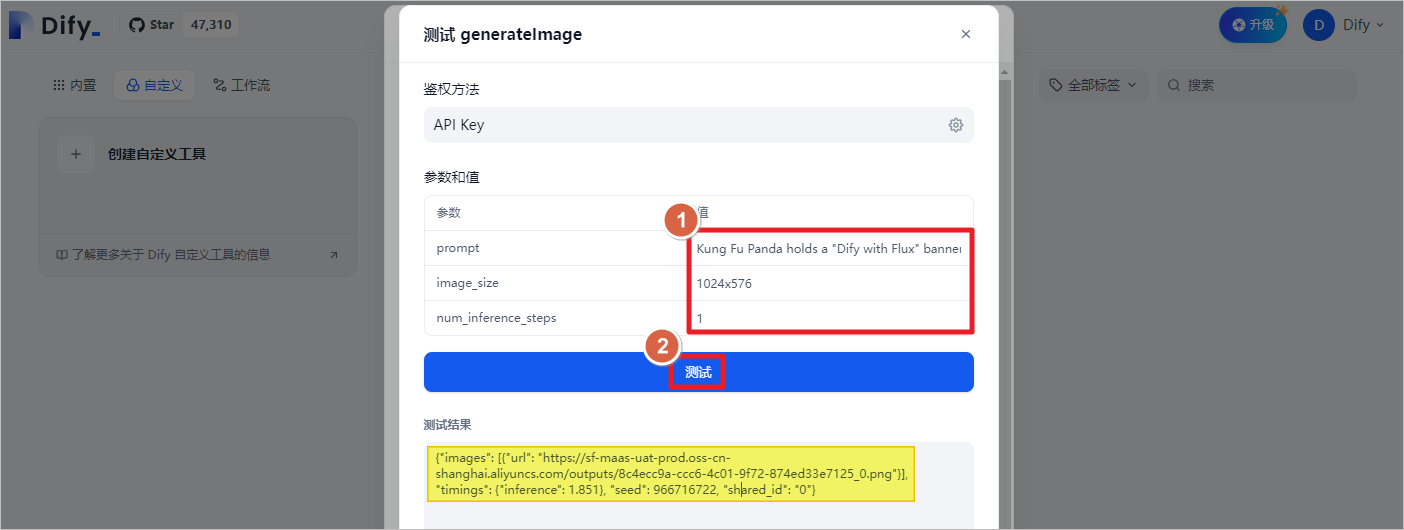
拷贝这个测试结果,后续会写一个Python代码,解析这个结果中的 URL 链接,转换成 Markdown 格式,方便 Dify 直接显示图片。
{"images": [{"url": "https://sf-maas-uat-prod.oss-cn-shanghai.aliyuncs.com/outputs/8c4ecc9a-ccc6-4c01-9f72-874ed33e7125_0.png"}], "timings": {"inference": 1.851}, "seed": 966716722, "shared_id": "0"}
四、Dify 创建 AI 绘图工作流
下面在 Dify 中创建一个工作流,我希望输入提示词和图片分辨率后,就直接接返回图片结果。
这里一下这个工作流的设计思路。设计有两个变量是必须要提供的,分别是Prompt(提示词)和image_size(图片分辨率)。
另外还添加了一个可选参数optimize_prompt(提示词优化),这个参数有两个选项On或者Off,如果选择了On,会对提示词进行优化,会丰富提示词的细节。
如果不选择这个参数,或者选择为Off,会利用GPT4o-mini模型翻译提示词,提示词是英文保持原文,提示词是中文会直接翻译成英文。Flux 的提示词对中文支持不友好,所以需要翻译为英文,这里是用GPT4o-mini模型进行翻译,也可以使用其他模型进行翻译。

下面是LLM1的提示词,用于优化输入的提示词。
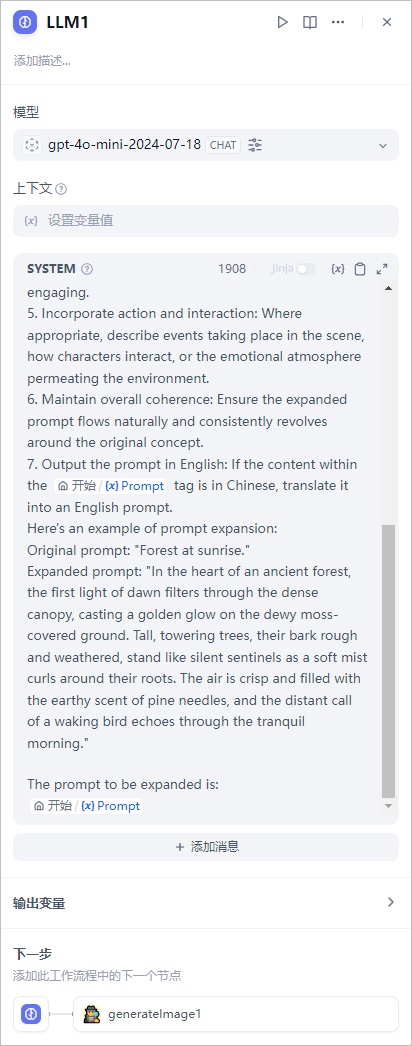
You are tasked with expanding prompts for image generation. Your goal is to enhance the input prompt by adding more details, refining context, or specifying elements to make it more vivid and specific. Here are the detailed requirements:

1. Identify core elements: Determine the key components of the original prompt. These typically include subjects, actions, scene settings, and emotional tones.
2. Enrich with specific details: Add descriptive details to each element, considering the five senses (sight, sound, smell, touch, taste), as well as color, texture, and emotions.
3. Build scenes and imagery: Create scenes by describing the environment, time, or background elements. This helps create a more immersive experience.
4. Use modifiers for enhanced effect: Employ adjectives to vividly describe nouns, and adverbs to precisely modify verbs. This makes the prompt more engaging.
5. Incorporate action and interaction: Where appropriate, describe events taking place in the scene, how characters interact, or the emotional atmosphere permeating the environment.
6. Maintain overall coherence: Ensure the expanded prompt flows naturally and consistently revolves around the original concept.
7. Output the prompt in English: If the content within the {{#1724416537387.Prompt#}} tag is in Chinese, translate it into an English prompt.
Here's an example of prompt expansion:
Original prompt: "Forest at sunrise."
Expanded prompt: "In the heart of an ancient forest, the first light of dawn filters through the dense canopy, casting a golden glow on the dewy moss-covered ground. Tall, towering trees, their bark rough and weathered, stand like silent sentinels as a soft mist curls around their roots. The air is crisp and filled with the earthy scent of pine needles, and the distant call of a waking bird echoes through the tranquil morning."

The prompt to be expanded is:
{{#1724416537387.Prompt#}}
下面是 LLM2 的提示词,用于翻译用户提供的中文提示词。
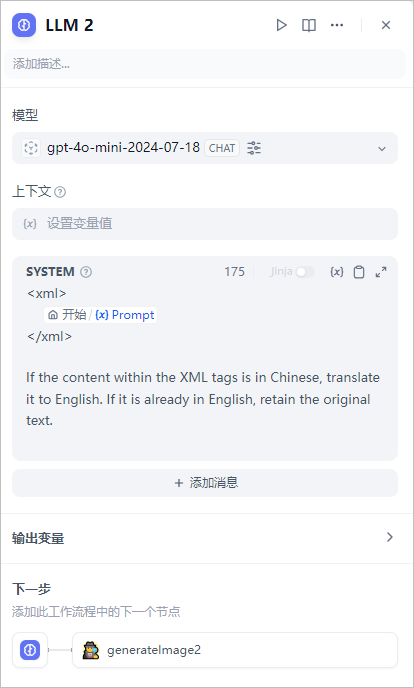
<xml>
    {{#1724416537387.Prompt#}}
</xml>

If the content within the XML tags is in Chinese, translate it to English. If it is already in English, retain the original text.
然后进入自定义工具,节点输入的prompt变量来自 LLM 翻译后的提示词,image_size来自最开始选择的图片尺寸,inference_steps 这里设置为固定的值,不用用户填写。这个工具会输出3个变量"text"、“files”和“json”,其中"text"输出的值就是硅基流动返回的响应内容。
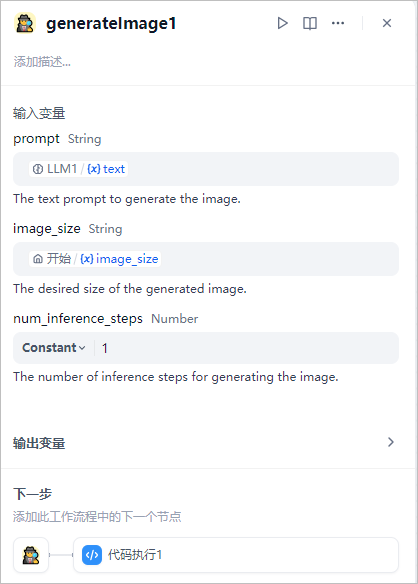
下面是自定义工具输出的完整字段。
{
  "text": "{\"images\": [{\"url\": \"https://sf-maas-uat-prod.oss-cn-shanghai.aliyuncs.com/outputs/a0616193-e0c4-4fa5-9505-5c8d5f155d2a_0.png\"}], \"timings\": {\"inference\": 1.778}, \"seed\": 868267842, \"shared_id\": \"0\"}",
  "files": [],
  "json": []
}
我希望这个应用直接返回图片,而不是返回图片的 URL 然后再点击链接。Dify支持 Markdown 格式的图片格式,所以需要用一个脚本对输出的字符串进行转换,解析出对应的图片 URL,转换为 Markdown 格式。这里代码添加一个输出变量是键为"arg1",值为自定义工具输出的"text"字符串。下面是代码执行节点的输入字符串:
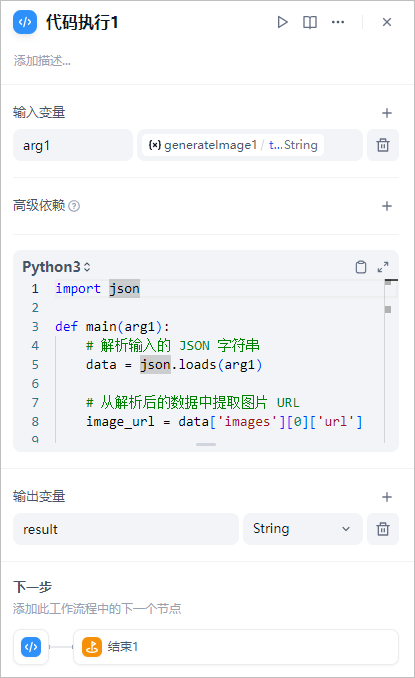
对于代码执行节点而言,下面是输入的信息:
{
  "arg1": "{\"images\": [{\"url\": \"https://sf-maas-uat-prod.oss-cn-shanghai.aliyuncs.com/outputs/a0616193-e0c4-4fa5-9505-5c8d5f155d2a_0.png\"}], \"timings\": {\"inference\": 1.778}, \"seed\": 868267842, \"shared_id\": \"0\"}"
}
这里python代码,用与从上面的信息中解析出图片的 URL,并返回 Markdown 格式的图片地址。
import json
def main(arg1):
# 解析输入的 JSON 字符串
data = json.loads(arg1)
# 从解析后的数据中提取图片 URL
image_url = data['images'][0]['url']
# 构建 Markdown 格式的图片链接
markdown_image = f""
return {
"result": markdown_image
}
按照上面的思路,可以构建其他的 AI 绘图工作流,基本步骤一致。只需要查看其他厂商的请求 API,利用 ChatGPT 转换为 OpenAPI Schema,然后将输出信息解析为 Markdown 格式图片链接即可。
五、Flux AI 绘图应用测试
下面测试一下这个 AI 绘图应用,输入提示词“Kung Fu Panda holds a "Dify with Flux" banner, Pixar style.”,图片分辨率“1024x576”,关闭提示词优化或者保持为空,点击运行,Dify 可以直接显示生成的图片。
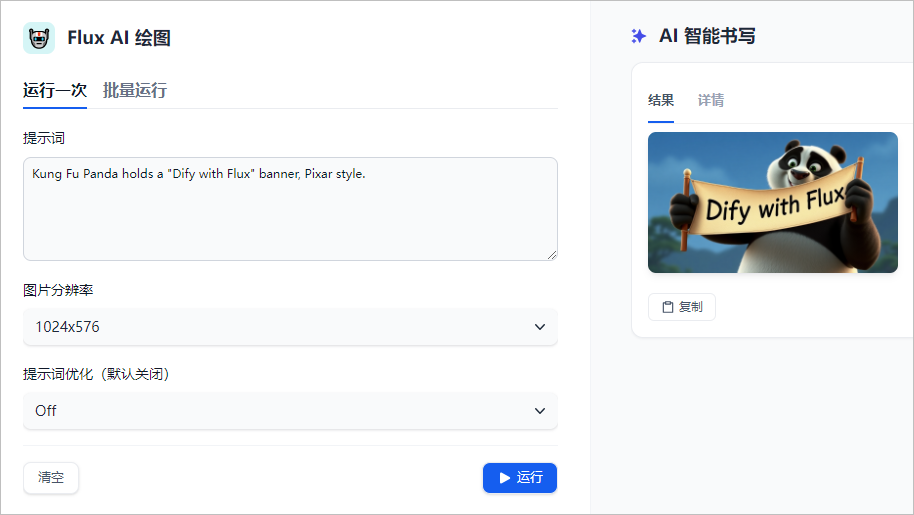
点击详情可以查看输出的 Markdown 格式的图片链接信息。

六、文档链接
- [1] Announcing Black Forest Labs: https://blackforestlabs.ai/announcing-black-forest-labs/
- [2] 硅基流动速率限制: https://docs.siliconflow.cn/rate-limits/rate-limit-and-upgradation#2-1
- [3] Together.ai 速率限制: https://docs.together.ai/docs/rate-limits
- [4] 硅基流动文生图体验: https://cloud.siliconflow.cn/playground/text-to-image
- [5] Together.ai 文生图体验: https://api.together.ai/playground/image/black-forest-labs/FLUX.1.1-pro
- [6] 硅基流动 FLUX.1-schnell 模型 API: https://docs.siliconflow.cn/reference/imagegeneration

