AWS上快速搭建OpenVPN服务器

YouTube视频
这篇文档介绍利用Shell脚本,快速搭建OpenVPN服务器,为用户提供远程访问VPN。
OpenVPN是使用最广泛的开源VPN,开源往往意味着体验不是那么美好。如果通过源码安装OpenVPN,确实会比较繁琐,但是操作过程又具有重复性,所以非常适合使用脚本来操作。
一、OpenVPN服务器配置
1.1 启动OpenVPN服务器
使用Amazon Linux 2 AMI镜像。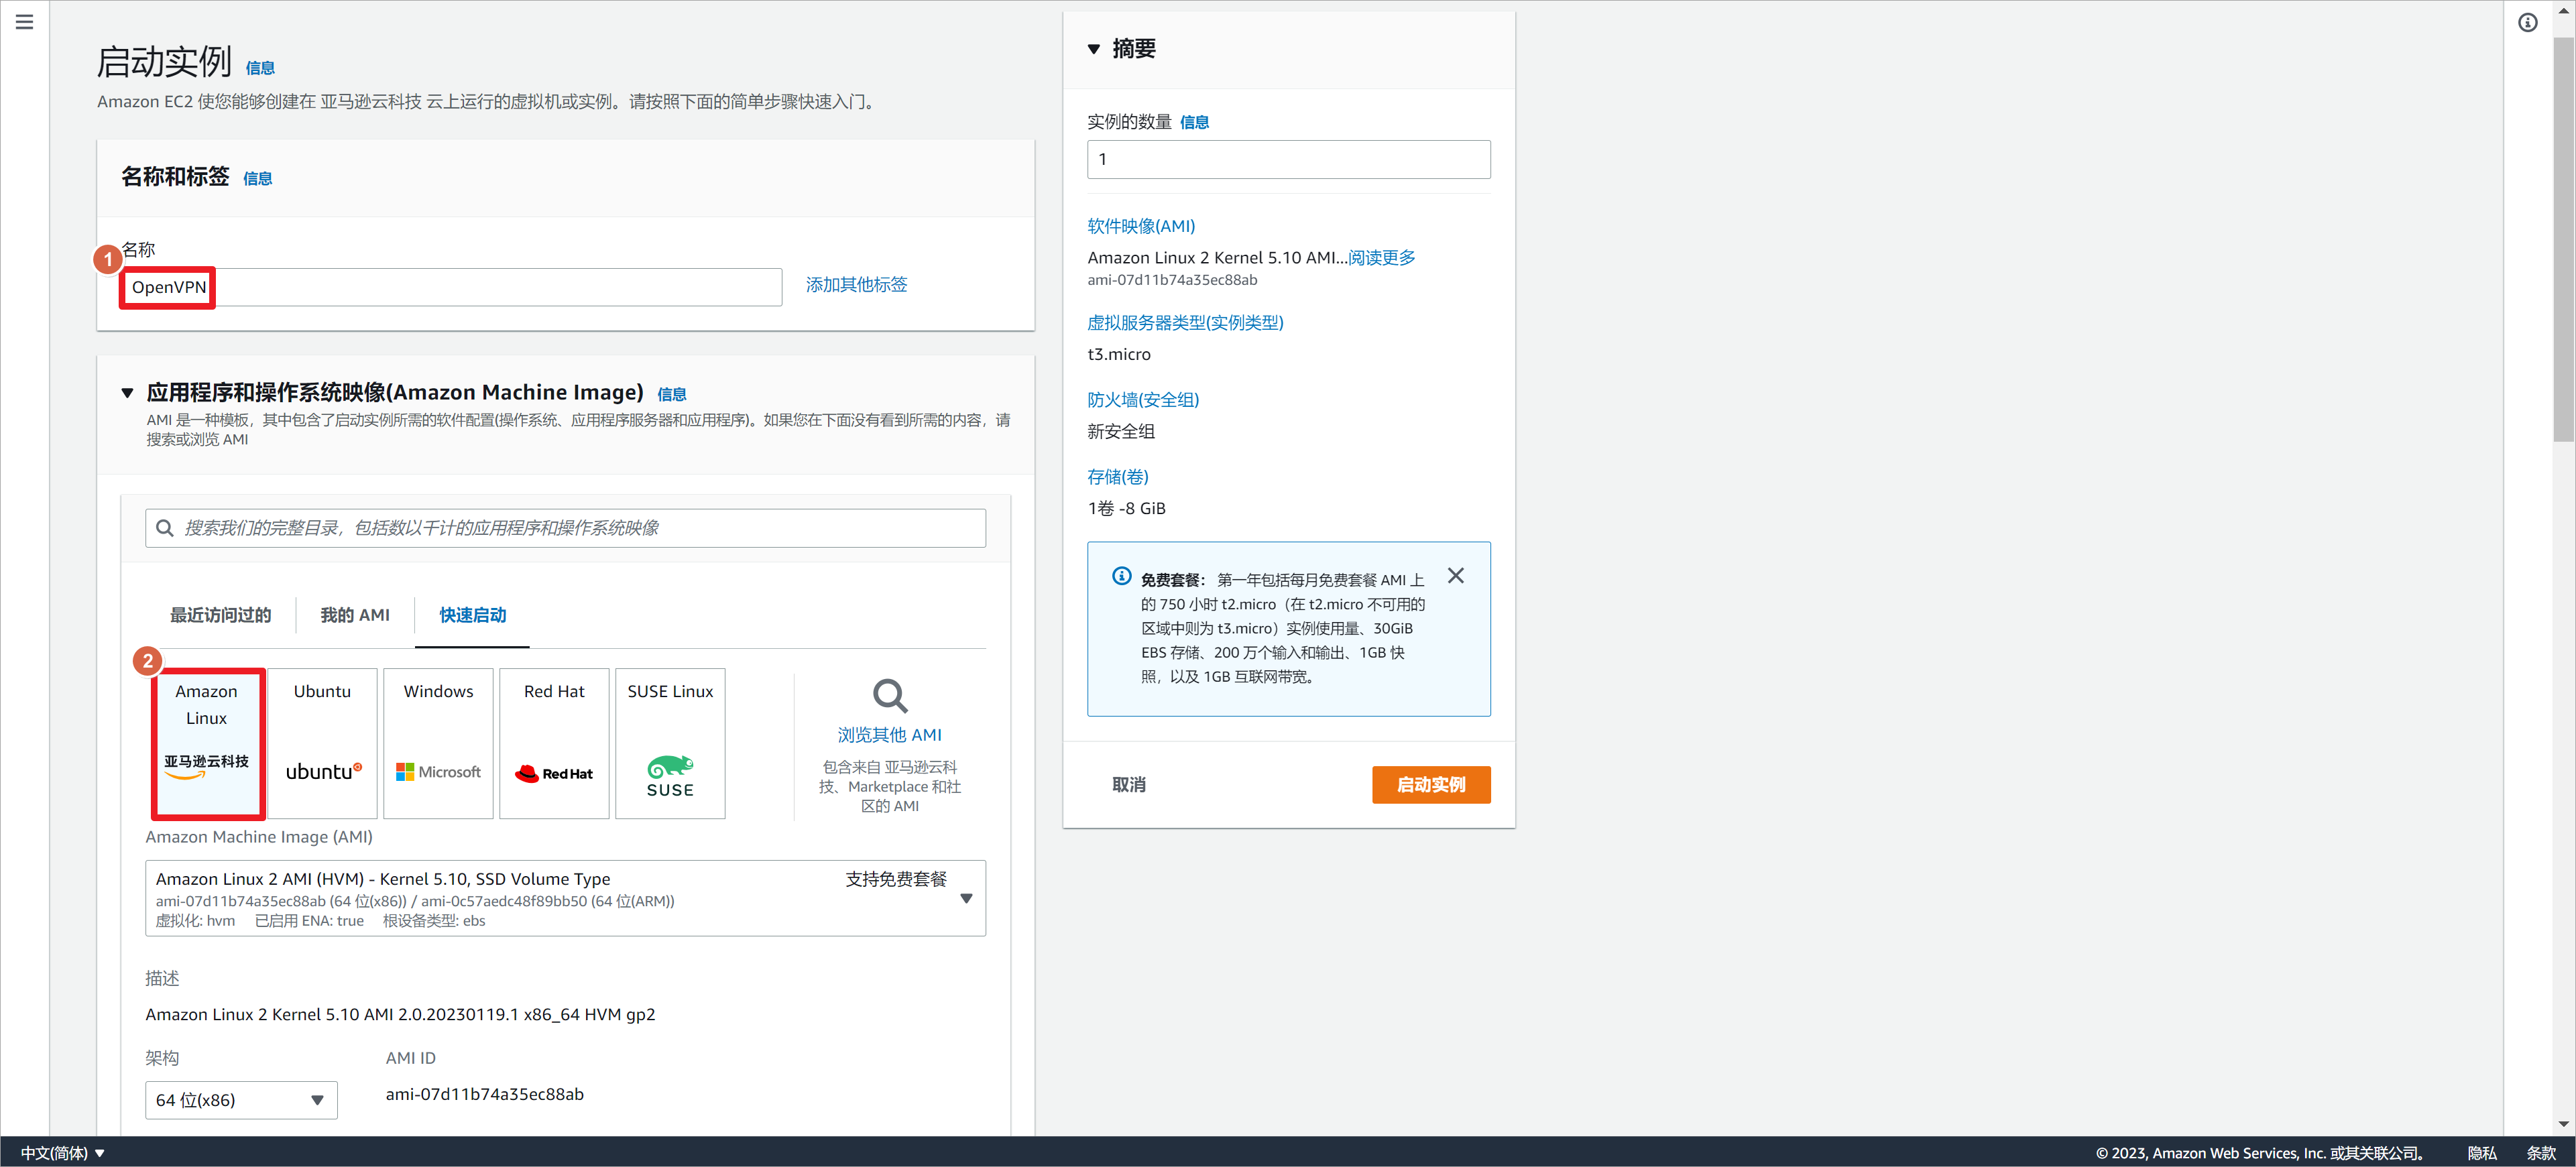
使用较小的实例测试即可。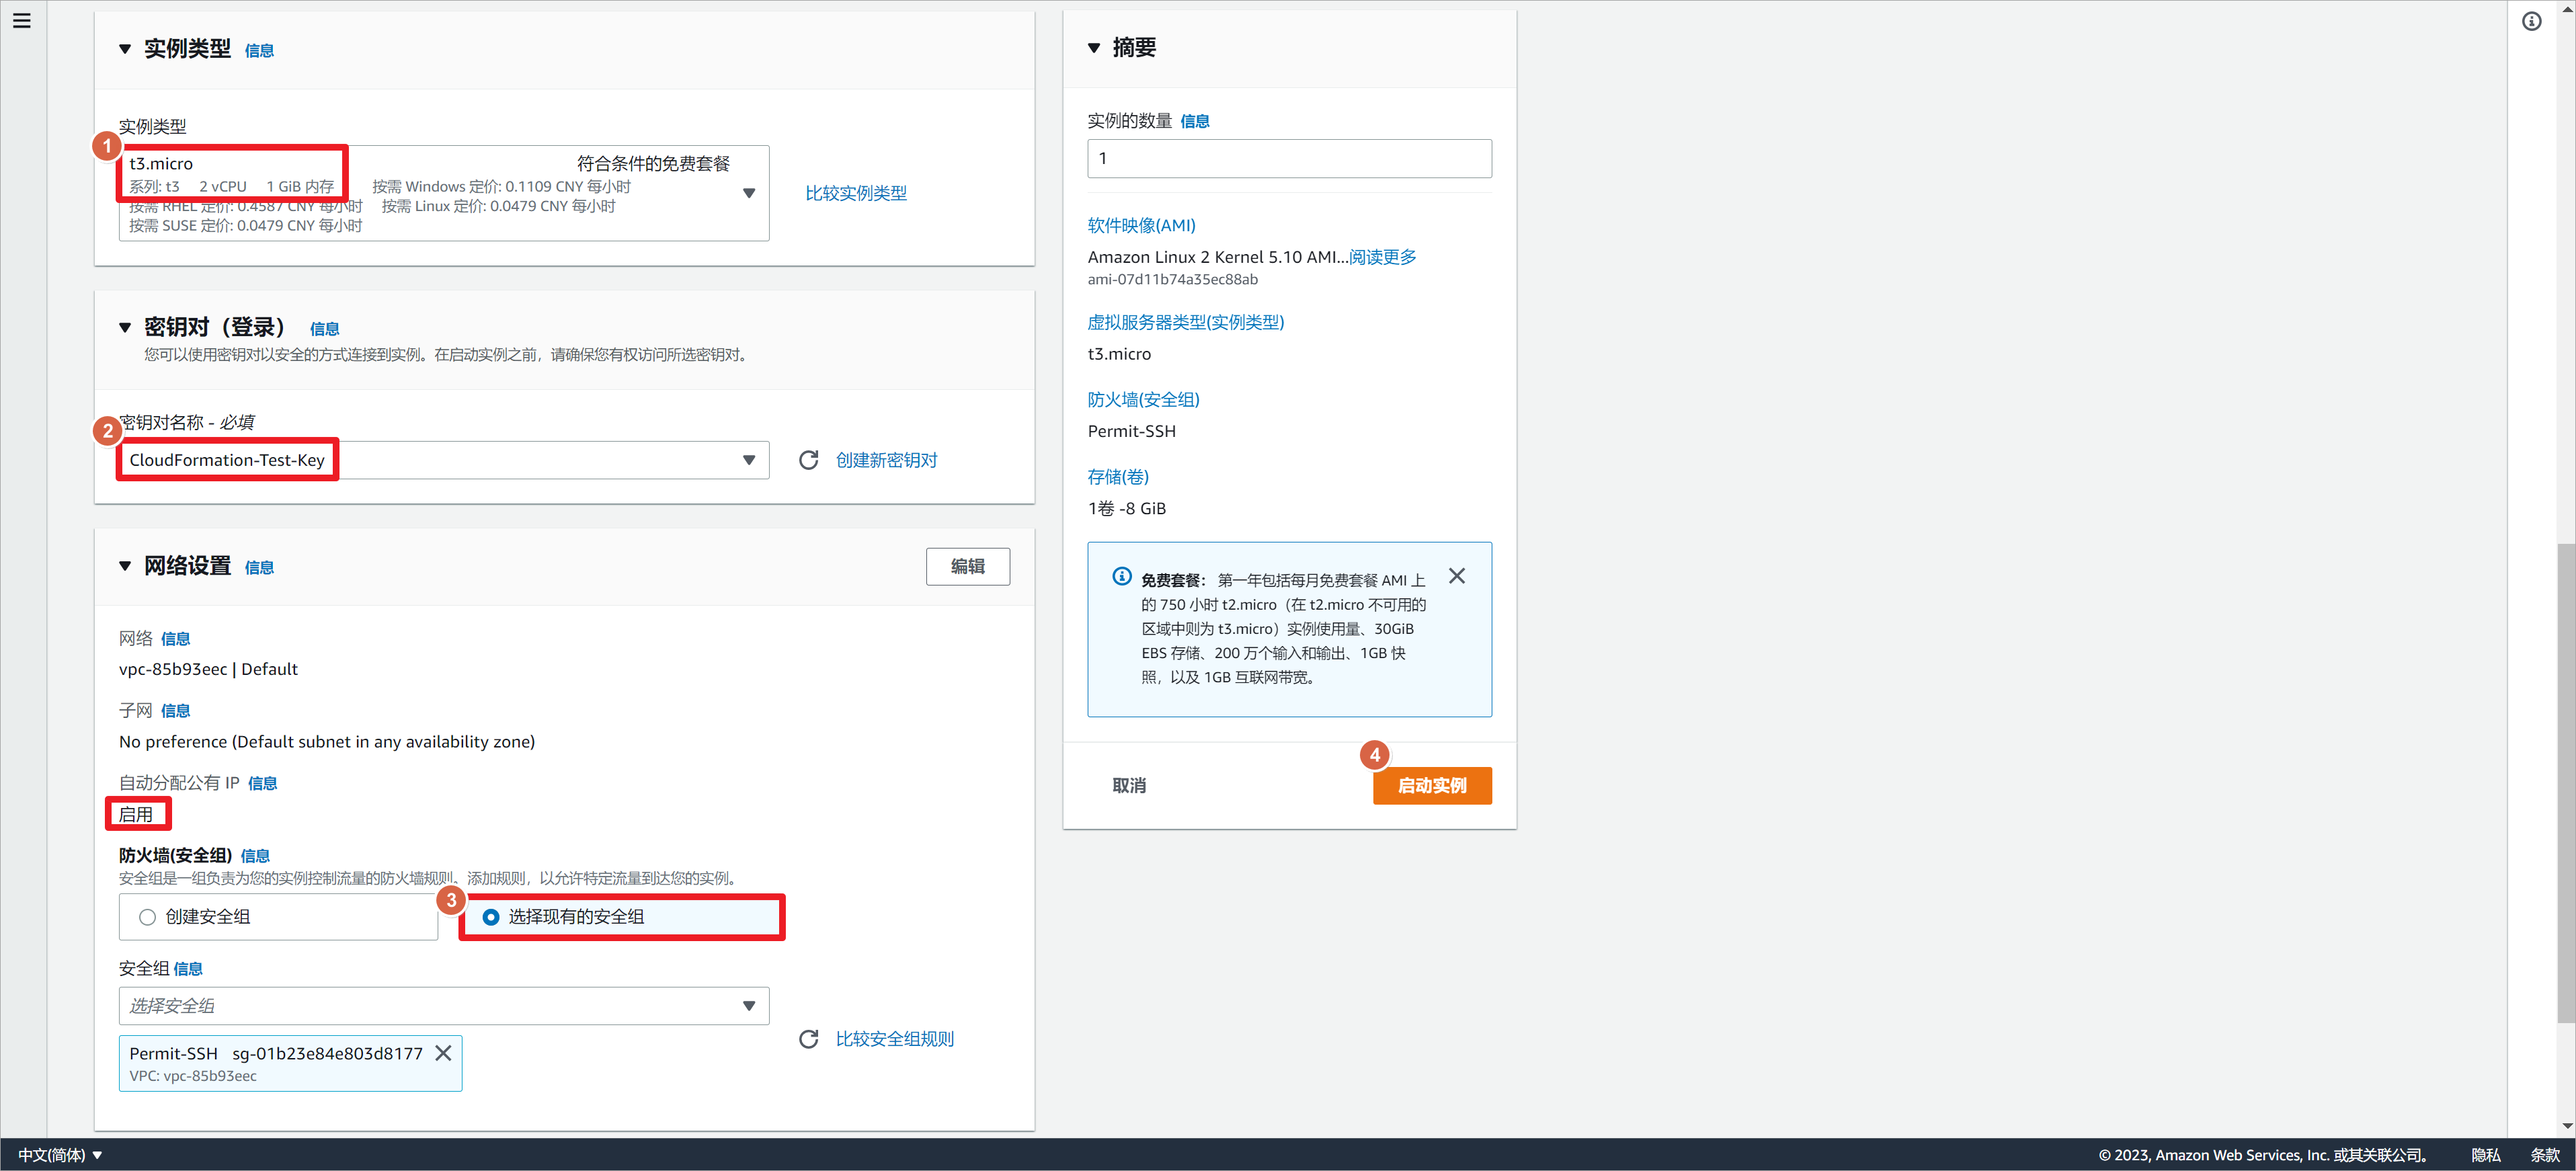
OpenVPN服务器默认使用UDP 1194端口。
1.2 使用脚本配置OpenVPN服务器
切换到root模式。
[ec2-user@ip-172-31-32-219 ~]$ sudo -i
下载脚本文件。
[root@ip-172-31-32-219 ~]# curl -O https://raw.githubusercontent.com/angristan/openvpn-install/master/openvpn-install.sh
为脚本授权运行权限。
[root@ip-172-31-32-219 ~]# chmod +x openvpn-install.sh
运行脚本,如果虚拟机有多块网卡,需要设置侦听的IP地址。
[root@ip-172-31-32-219 ~]# ./openvpn-install.sh
Welcome to the OpenVPN installer!
The git repository is available at: https://github.com/angristan/openvpn-install

I need to ask you a few questions before starting the setup.
You can leave the default options and just press enter if you are ok with them.

I need to know the IPv4 address of the network interface you want OpenVPN listening to.
Unless your server is behind NAT, it should be your public IPv4 address.
IP address: 172.31.32.219
设置公网拨号地址。
It seems this server is behind NAT. What is its public IPv4 address or hostname?
We need it for the clients to connect to the server.
Public IPv4 address or hostname: 52.83.11.64
不启动IPv6。
Checking for IPv6 connectivity...

Your host does not appear to have IPv6 connectivity.

Do you want to enable IPv6 support (NAT)? [y/n]: n
侦听1194端口。
What port do you want OpenVPN to listen to?
   1) Default: 1194
   2) Custom
   3) Random [49152-65535]
Port choice [1-3]: 1
使用UDP协议。
What protocol do you want OpenVPN to use?
UDP is faster. Unless it is not available, you shouldn't use TCP.
   1) UDP
   2) TCP
Protocol [1-2]: 1
设置推送的DNS服务器。
What DNS resolvers do you want to use with the VPN?
   1) Current system resolvers (from /etc/resolv.conf)
   2) Self-hosted DNS Resolver (Unbound)
   3) Cloudflare (Anycast: worldwide)
   4) Quad9 (Anycast: worldwide)
   5) Quad9 uncensored (Anycast: worldwide)
   6) FDN (France)
   7) DNS.WATCH (Germany)
   8) OpenDNS (Anycast: worldwide)
   9) Google (Anycast: worldwide)
   10) Yandex Basic (Russia)
   11) AdGuard DNS (Anycast: worldwide)
   12) NextDNS (Anycast: worldwide)
   13) Custom
DNS [1-12]: 1
不启用压缩算法。
Do you want to use compression? It is not recommended since the VORACLE attack makes use of it.
Enable compression? [y/n]: n
使用默认的加密算法。
Do you want to customize encryption settings?
Unless you know what you're doing, you should stick with the default parameters provided by the script.
Note that whatever you choose, all the choices presented in the script are safe. (Unlike OpenVPN's defaults)
See https://github.com/angristan/openvpn-install#security-and-encryption to learn more.

Customize encryption settings? [y/n]: n
创建VPN用户,设置用户名为demo-user。
Okay, that was all I needed. We are ready to setup your OpenVPN server now.
You will be able to generate a client at the end of the installation.
Press any key to continue...
...
...
...
Tell me a name for the client.
The name must consist of alphanumeric character. It may also include an underscore or a dash.
Client name: demo-user
选择2,设置用户密码。
Do you want to protect the configuration file with a password?
(e.g. encrypt the private key with a password)
   1) Add a passwordless client
   2) Use a password for the client
Select an option [1-2]: 2
设置完成后,下载用户配置文件,路径在/home/ec2-user/demo-user.ovpn。
⚠️ You will be asked for the client password below ⚠️

* Using SSL: openssl OpenSSL 1.0.2k-fips  26 Jan 2017

* Using Easy-RSA configuration: /etc/openvpn/easy-rsa/vars

* The preferred location for 'vars' is within the PKI folder.
  To silence this message move your 'vars' file to your PKI
  or declare your 'vars' file with option: --vars=<FILE>
Generating a 256 bit EC private key
writing new private key to '/etc/openvpn/easy-rsa/pki/c2f0af32/temp.2428b7bf'
Enter PEM pass phrase:
Verifying - Enter PEM pass phrase:
-----

Notice
------
Keypair and certificate request completed. Your files are:
req: /etc/openvpn/easy-rsa/pki/reqs/demo-user.req
key: /etc/openvpn/easy-rsa/pki/private/demo-user.key
Using configuration from /etc/openvpn/easy-rsa/pki/c2f0af32/temp.49371c35
Check that the request matches the signature
Signature ok
The Subject's Distinguished Name is as follows
commonName            :ASN.1 12:'demo-user'
Certificate is to be certified until May 10 12:58:42 2025 GMT (825 days)

Write out database with 1 new entries
Data Base Updated

Notice
------
Certificate created at:
* /etc/openvpn/easy-rsa/pki/issued/demo-user.crt

Notice
------
Inline file created:
* /etc/openvpn/easy-rsa/pki/inline/demo-user.inline
Client demo-user added.

The configuration file has been written to /home/ec2-user/demo-user.ovpn.
Download the .ovpn file and import it in your OpenVPN client.
1.3 修改OpenVPN服务器配置文件
如果有特殊的需求,可以进一步修改OpenVPN的配置文件,路径为/etc/openvpn/server.conf。
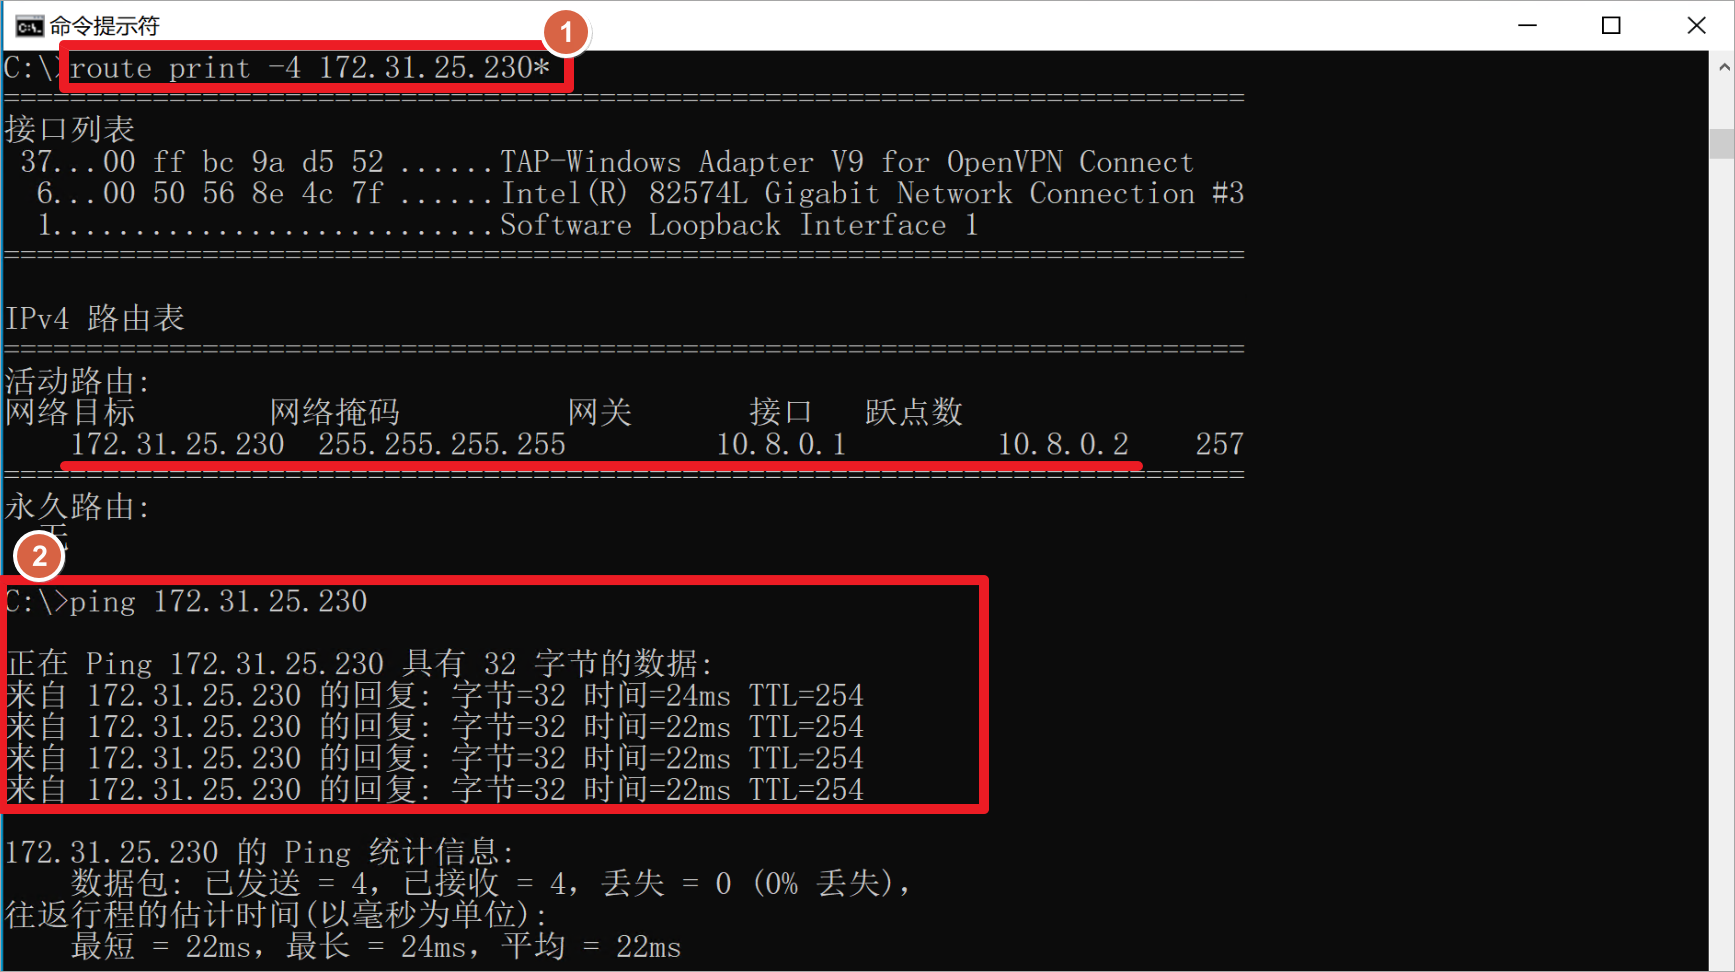
配置文件默认推送网关到用户电脑,也就是默认所有流量都会走OpenVPN通道,思科将这种模式叫tunnel all模式。这里设置只有访问172.31.25.230主机时,才会走OpenVPN通过,思科将这种模式叫split-tunnel模式。
另外设置OpenVPN的拨号日志路径,路径为/var/log/openvpn/openvpn.log。
[root@ip-172-31-32-219 ~]# vim /etc/openvpn/server.conf
port 1194
proto udp
dev tun
user nobody
group nobody
persist-key
persist-tun
keepalive 10 120
topology subnet
server 10.8.0.0 255.255.255.0
ifconfig-pool-persist ipp.txt
#push "dhcp-option DNS 172.31.0.2"
#push "redirect-gateway def1 bypass-dhcp"
push "route 172.31.25.230 255.255.255.255"
dh none
ecdh-curve prime256v1
tls-crypt tls-crypt.key
crl-verify crl.pem
ca ca.crt
cert server_NbyleI1QGSvTy34r.crt
key server_NbyleI1QGSvTy34r.key
auth SHA256
cipher AES-128-GCM
ncp-ciphers AES-128-GCM
tls-server
tls-version-min 1.2
tls-cipher TLS-ECDHE-ECDSA-WITH-AES-128-GCM-SHA256
client-config-dir /etc/openvpn/ccd
status /var/log/openvpn/status.log
log /var/log/openvpn/openvpn.log
verb 3
修改了下面这些默认配置文件。
#push "dhcp-option DNS 172.31.0.2"
#push "redirect-gateway def1 bypass-dhcp"
push "route 172.31.25.230 255.255.255.255"
log /var/log/openvpn/openvpn.log
重启OpenVPN服务。
[root@ip-172-31-32-219 ~]# systemctl restart openvpn@server.service
二、安装OpenVPN Windows客户端测试
OpenVPN Windows客户端下载链接:https://openvpn.net/client-connect-vpn-for-windows,这个链接需要「科学上网」才能访问。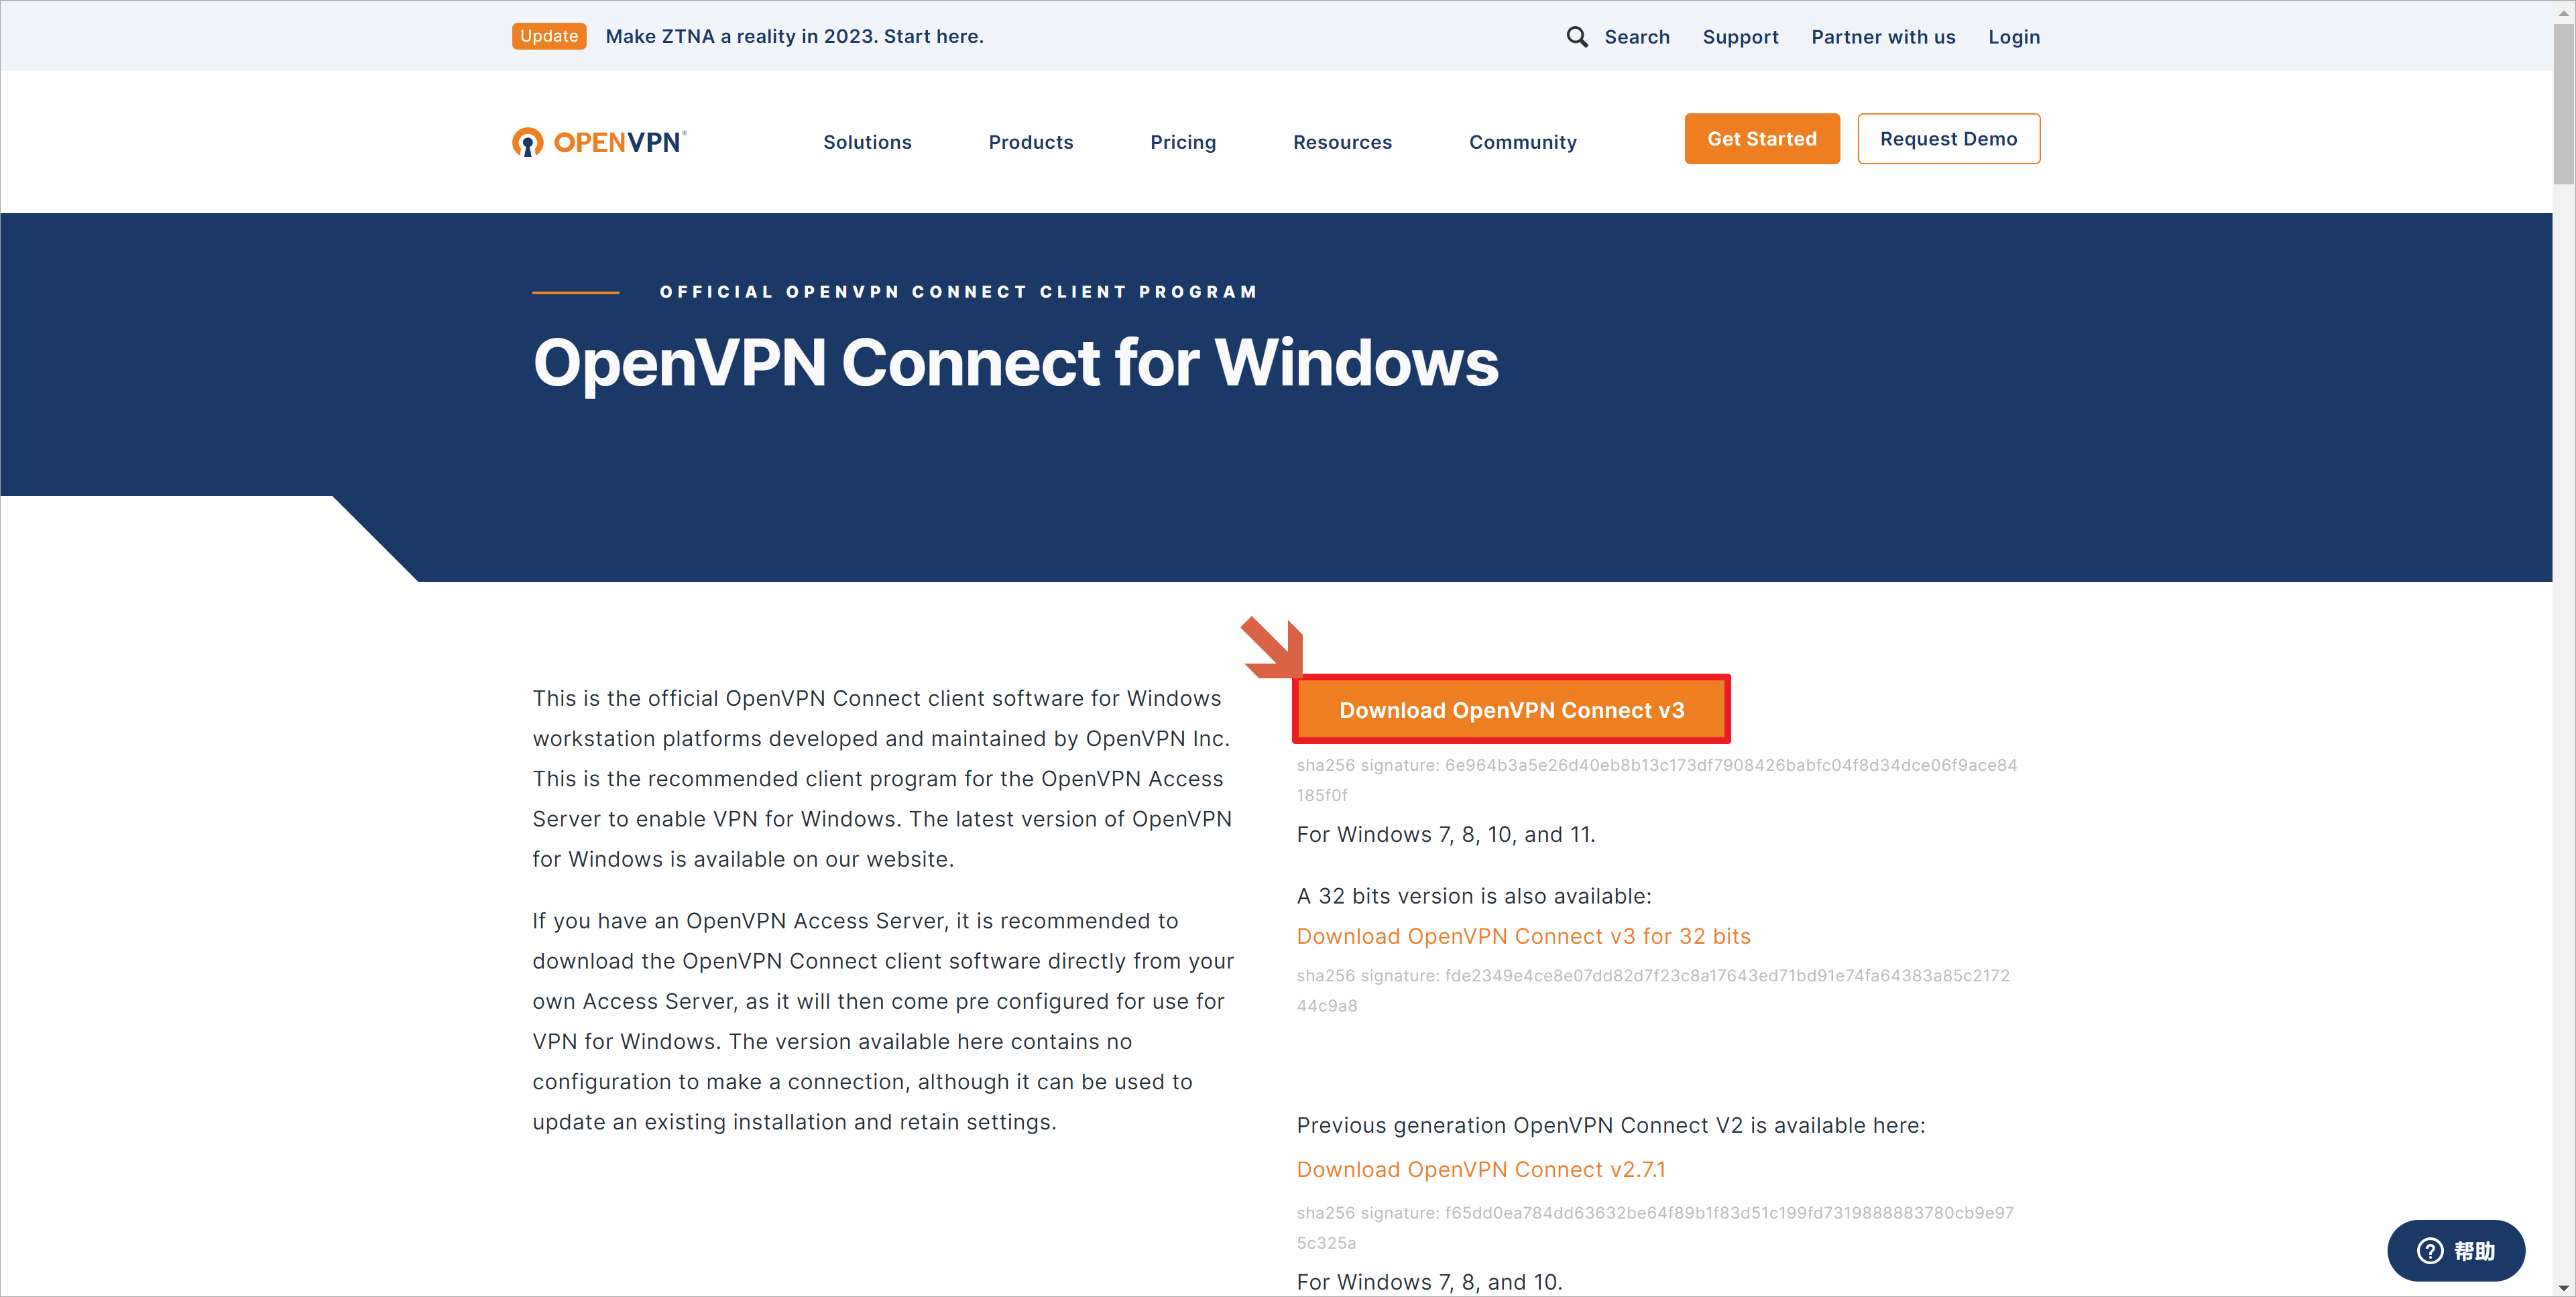
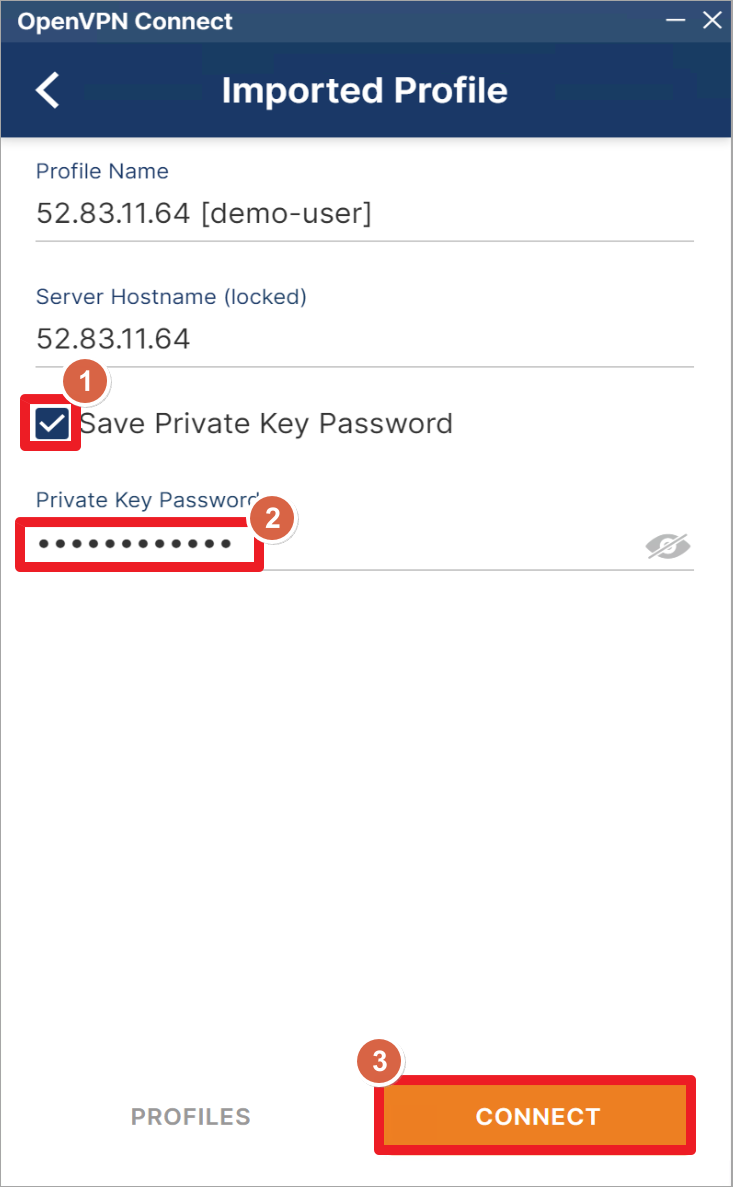
安装客户端之后,打开OpenVPN客户端。点击FILE,将下载的用户配置文件拖拽到虚线方框内。
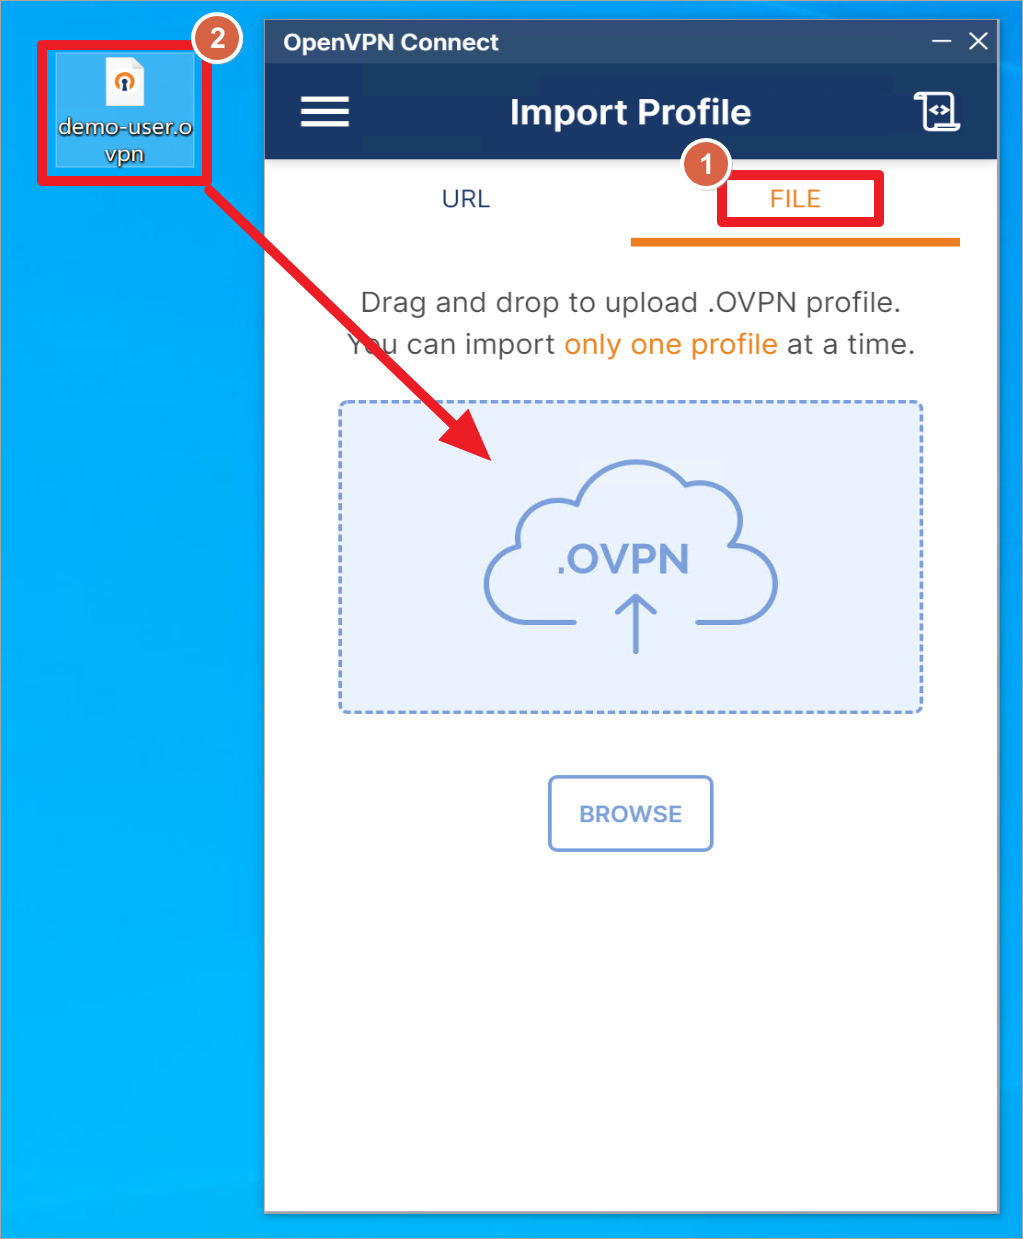
点击保存密码,然后输入为用户设置的密码。
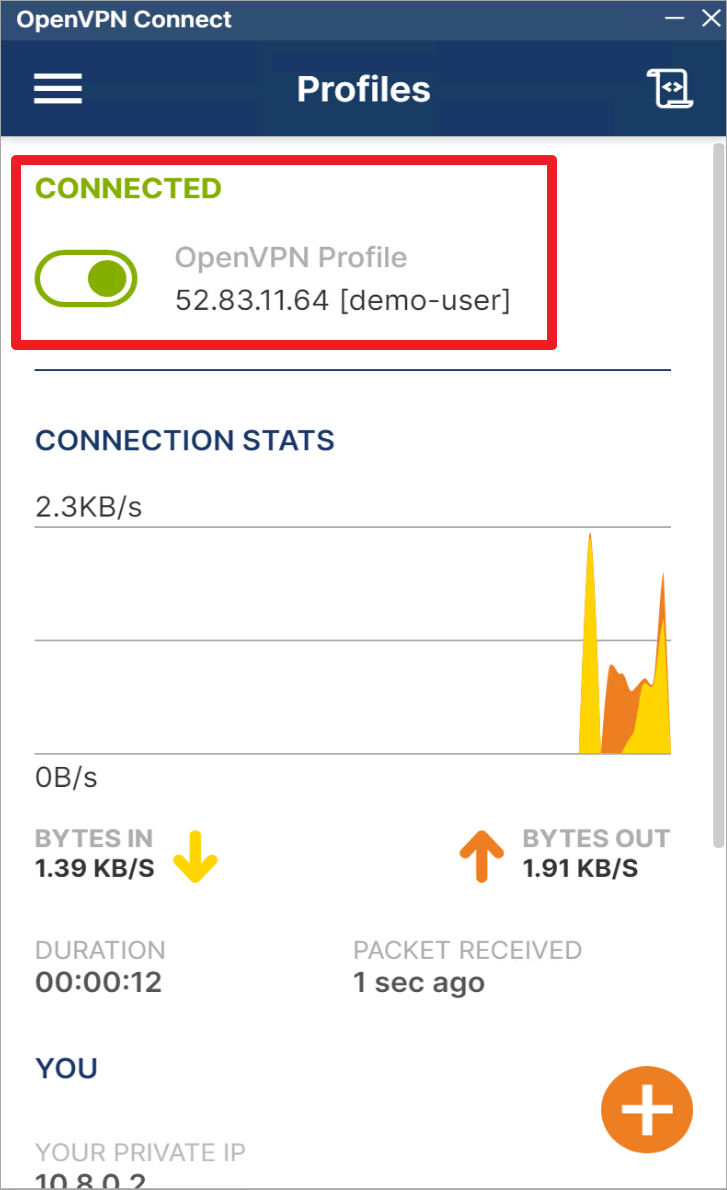
连接成功。
在客户端上查看路由表,查看到推送的主机路由,流量指向OpenVPN的隧道。测试到AWS内网的服务器连通性。
查看OpenVPN日志信息。
[root@ip-172-31-32-219 ~]# more /var/log/openvpn/openvpn.log
Sun Feb  5 13:28:43 2023 OpenVPN 2.4.12 x86_64-redhat-linux-gnu [Fedora EPEL patched] [SSL (OpenSSL)] [LZO] [LZ4] [EPOLL] [PKCS11] [MH/PKTINFO] [AEAD] built on Mar 17
 2022
Sun Feb  5 13:28:43 2023 library versions: OpenSSL 1.0.2k-fips  26 Jan 2017, LZO 2.06
Sun Feb  5 13:28:43 2023 CRL: loaded 1 CRLs from file crl.pem
Sun Feb  5 13:28:43 2023 ECDH curve prime256v1 added
Sun Feb  5 13:28:43 2023 Outgoing Control Channel Encryption: Cipher 'AES-256-CTR' initialized with 256 bit key
Sun Feb  5 13:28:43 2023 Outgoing Control Channel Encryption: Using 256 bit message hash 'SHA256' for HMAC authentication
Sun Feb  5 13:28:43 2023 Incoming Control Channel Encryption: Cipher 'AES-256-CTR' initialized with 256 bit key
Sun Feb  5 13:28:43 2023 Incoming Control Channel Encryption: Using 256 bit message hash 'SHA256' for HMAC authentication
Sun Feb  5 13:28:43 2023 TUN/TAP device tun0 opened
Sun Feb  5 13:28:43 2023 TUN/TAP TX queue length set to 100
Sun Feb  5 13:28:43 2023 /sbin/ip link set dev tun0 up mtu 1500
Sun Feb  5 13:28:43 2023 /sbin/ip addr add dev tun0 10.8.0.1/24 broadcast 10.8.0.255
Sun Feb  5 13:28:43 2023 Could not determine IPv4/IPv6 protocol. Using AF_INET
Sun Feb  5 13:28:43 2023 Socket Buffers: R=[212992->212992] S=[212992->212992]
Sun Feb  5 13:28:43 2023 UDPv4 link local (bound): [AF_INET][undef]:1194
Sun Feb  5 13:28:43 2023 UDPv4 link remote: [AF_UNSPEC]
Sun Feb  5 13:28:43 2023 GID set to nobody
Sun Feb  5 13:28:43 2023 UID set to nobody
Sun Feb  5 13:28:43 2023 MULTI: multi_init called, r=256 v=256
Sun Feb  5 13:28:43 2023 IFCONFIG POOL: base=10.8.0.2 size=252, ipv6=0
Sun Feb  5 13:28:43 2023 ifconfig_pool_read(), in='demo-user,10.8.0.2', TODO: IPv6
Sun Feb  5 13:28:43 2023 succeeded -> ifconfig_pool_set()
Sun Feb  5 13:28:43 2023 IFCONFIG POOL LIST
Sun Feb  5 13:28:43 2023 demo-user,10.8.0.2
Sun Feb  5 13:28:43 2023 Initialization Sequence Completed
查看OpenVPN用户状态日志。
[root@ip-172-31-32-219 ~]# more /var/log/openvpn/status.log
OpenVPN CLIENT LIST
Updated,Sun Feb  5 13:41:02 2023
Common Name,Real Address,Bytes Received,Bytes Sent,Connected Since
demo-user,214.251.173.134:51498,6817,2338,Sun Feb  5 13:40:37 2023
ROUTING TABLE
Virtual Address,Common Name,Real Address,Last Ref
10.8.0.2,demo-user,214.251.173.134:51498,Sun Feb  5 13:40:37 2023
GLOBAL STATS
Max bcast/mcast queue length,1
END
三、添加、删除用户
3.1 添加用户
再次运行脚本,系统会识别出来已经安装了OpenVPN服务器,此时选择1,添加用户。
[root@ip-172-31-32-219 ~]# ./openvpn-install.sh
Welcome to OpenVPN-install!
The git repository is available at: https://github.com/angristan/openvpn-install

It looks like OpenVPN is already installed.

What do you want to do?
   1) Add a new user
   2) Revoke existing user
   3) Remove OpenVPN
   4) Exit
Select an option [1-4]: 1
选择2,设置用户密码。
Tell me a name for the client.
The name must consist of alphanumeric character. It may also include an underscore or a dash.
Client name: demo-user1

Do you want to protect the configuration file with a password?
(e.g. encrypt the private key with a password)
   1) Add a passwordless client
   2) Use a password for the client
Select an option [1-2]: 2
设置用户密码,然后下载用户配置文件,配置目录为/home/ec2-user/demo-user1.ovpn。
⚠️ You will be asked for the client password below ⚠️

* Using SSL: openssl OpenSSL 1.0.2k-fips  26 Jan 2017

* Using Easy-RSA configuration: /etc/openvpn/easy-rsa/vars

* The preferred location for 'vars' is within the PKI folder.
  To silence this message move your 'vars' file to your PKI
  or declare your 'vars' file with option: --vars=<FILE>
Generating a 256 bit EC private key
writing new private key to '/etc/openvpn/easy-rsa/pki/c3025421/temp.38bc49b5'
Enter PEM pass phrase:
Verifying - Enter PEM pass phrase:
-----

Notice
------
Keypair and certificate request completed. Your files are:
req: /etc/openvpn/easy-rsa/pki/reqs/demo-user1.req
key: /etc/openvpn/easy-rsa/pki/private/demo-user1.key
Using configuration from /etc/openvpn/easy-rsa/pki/c3025421/temp.919573e0
Check that the request matches the signature
Signature ok
The Subject's Distinguished Name is as follows
commonName            :ASN.1 12:'demo-user1'
Certificate is to be certified until May 10 13:59:00 2025 GMT (825 days)

Write out database with 1 new entries
Data Base Updated

Notice
------
Certificate created at:
* /etc/openvpn/easy-rsa/pki/issued/demo-user1.crt

Notice
------
Inline file created:
* /etc/openvpn/easy-rsa/pki/inline/demo-user1.inline
Client demo-user1 added.

The configuration file has been written to /home/ec2-user/demo-user1.ovpn.
Download the .ovpn file and import it in your OpenVPN client.
3.2 删除用户
再次运行脚本,系统会识别出来已经安装了OpenVPN服务器,此时选择2,删除用户。
[root@ip-172-31-32-219 ~]# ./openvpn-install.sh
Welcome to OpenVPN-install!
The git repository is available at: https://github.com/angristan/openvpn-install

It looks like OpenVPN is already installed.

What do you want to do?
   1) Add a new user
   2) Revoke existing user
   3) Remove OpenVPN
   4) Exit
Select an option [1-4]: 2
选择用户的编号,删除完成。
Select the existing client certificate you want to revoke
     1) demo-user
     2) demo-user1
Select one client [1-2]: 2

* Using SSL: openssl OpenSSL 1.0.2k-fips  26 Jan 2017

* Using Easy-RSA configuration: /etc/openvpn/easy-rsa/vars

* The preferred location for 'vars' is within the PKI folder.
  To silence this message move your 'vars' file to your PKI
  or declare your 'vars' file with option: --vars=<FILE>

WARNING
=======
This process is destructive!

These files will be MOVED to the 'revoked' storage directory:
* /etc/openvpn/easy-rsa/pki/issued/demo-user1.crt
* /etc/openvpn/easy-rsa/pki/private/demo-user1.key
* /etc/openvpn/easy-rsa/pki/reqs/demo-user1.req

These files will be DELETED:
All PKCS files for commonName : demo-user1

The inline credentials files:
* /etc/openvpn/easy-rsa/pki/demo-user1.creds
* /etc/openvpn/easy-rsa/pki/inline/demo-user1.inline

The duplicate certificate:
* /etc/openvpn/easy-rsa/pki/certs_by_serial/6E6587E0FA65C86B798FA8C1470C1E11.pem

Using configuration from /etc/openvpn/easy-rsa/pki/89dd4fc4/temp.a7285a95
Revoking Certificate 6E6587E0FA65C86B798FA8C1470C1E11.
Data Base Updated

Notice
------
                              * IMPORTANT *

Revocation was successful. You must run 'gen-crl' and upload a new CRL to your
infrastructure in order to prevent the revoked certificate from being accepted.

* Using SSL: openssl OpenSSL 1.0.2k-fips  26 Jan 2017

* Using Easy-RSA configuration: /etc/openvpn/easy-rsa/vars

* The preferred location for 'vars' is within the PKI folder.
  To silence this message move your 'vars' file to your PKI
  or declare your 'vars' file with option: --vars=<FILE>
Using configuration from /etc/openvpn/easy-rsa/pki/7e330bce/temp.60d72588

Notice
------
An updated CRL has been created.
CRL file: /etc/openvpn/easy-rsa/pki/crl.pem

Certificate for client demo-user1 revoked.
当删除用户后,如果想要重新创建相同名称的用户,会遇见下面报错:The specified client CN was already found in easy-rsa, please choose another name.。
[root@ip-172-31-32-219 ~]# ./openvpn-install.sh
Welcome to OpenVPN-install!
The git repository is available at: https://github.com/angristan/openvpn-install

It looks like OpenVPN is already installed.

What do you want to do?
   1) Add a new user
   2) Revoke existing user
   3) Remove OpenVPN
   4) Exit
Select an option [1-4]: 1

Tell me a name for the client.
The name must consist of alphanumeric character. It may also include an underscore or a dash.
Client name: demo-user1

Do you want to protect the configuration file with a password?
(e.g. encrypt the private key with a password)
   1) Add a passwordless client
   2) Use a password for the client
Select an option [1-2]: 2

The specified client CN was already found in easy-rsa, please choose another name.
删除用户之后,需要删除吊销的证书信息,才能创建相同的用户名。
vim /etc/openvpn/easy-rsa/pki/index.txt

V       250510125604Z           02013C6CBD6C3823EF292FEAA6C1134E        unknown /CN=server_NbyleI1QGSvTy34r
V       250510125842Z           D17A753048CD839A872A7E50FC1262D1        unknown /CN=demo-user
R       250510135900Z   230205140005Z   6E6587E0FA65C86B798FA8C1470C1E11        unknown /CN=demo-user1
四、文档链接
- Github 自动安装脚本openvpn-install:https://github.com/angristan/openvpn-install
- OpenVPN community 文档:https://openvpn.net/community-resources/how-to/#installing-openvpn
- OpenVPN Access Server价格:https://openvpn.net/access-server/pricing/
- OpenVPN Community Edition 与 OpenVPN Access Server对比:https://openvpn.net/blog/openvpn-community-edition-vs-access-server/
- OpenVPN server.conf 配置文件含义:https://github.com/OpenVPN/openvpn/blob/master/sample/sample-config-files/server.conf
- Mastering OpenVPN 书籍:https://learning.oreilly.com/library/view/mastering-openvpn/9781783553136/

